Please choose your country or region so we can show you the most relevant content.
It looks like you are in United States? Accept
Africa
- Algeria
- Angola
- Benin
- Botswana
- Burkina Faso
- Burundi
- Cabo Verde
- Cameroon
- Central African Republic
- Chad
- Comoros
- Congo
- Côte d'Ivoire
- Djibouti
- DR Congo
- Equatorial Guinea
- Eritrea
- Eswatini
- Ethiopia
- Gabon
- Gambia
- Ghana
- Guinea
- Guinea-Bissau
- Kenya
- Lesotho
- Liberia
Asia
Australasia
Europe
- Albania
- Andorra
- Austria
- Belarus
- Belgium
- Bosnia and Herzegovina
- Bulgaria
- Croatia
- Czechia
- Denmark
- Estonia
- Finland
- France
- Germany
- Greece
- Greenland
- Holy See
- Hungary
- Iceland
- Ireland
- Italy
- Latvia
- Liechtenstein
- Lithuania
North America
Middle East


Adventure Camping Expedition Arctic
CANOE CAMPING – WHAT TO TAKE AND HOW TO TAKE IT
7 Mar 2013
The second in a 2-part article on canoe camping, by our guest Blogger, Tim Gent.
Here, we delve a bit deeper into the world of equipment, with some very good recommendations and hints, based on Tim’s own experience – if you’ve hints and tips of your own, we’d love to hear of them in the Comments section.
— 0 —
Arms starting to tire, and with that gentle slide into a short Arctic summer night already upon us, we pulled ashore again. Beautiful as this fine river was, we were starting to grow a little concerned.
Over the last few miles, in fact long since we’d decided to it was time to stop, close-packed spruce, fir and pine had pushed tight to the water’s edge, dark spiky fingers dipping to touch the clear flow and guard the bank. No space for a tent. Rounding a wide bend, sinuous ribbons of weed waving deep in the current below us, an open area had finally appeared, the absence of trees explained on stepping gingerly ashore to start sinking into the marshy ground.
Now, at last, a small flat area was visible in the slight gloom, pressed close by giant conifers and bushes. Might there be space?
A little judicious pruning exposed a level area. It certainly wasn’t big, but it would do, even if we did have to cook on the narrow strip of stones exposed along the water’s edge.
As we ate a welcome dinner the moon rose into a slowly darkening blue sky, and grayling broke the surface just beyond our feet, rising to join us in our meal. It might have been hard to find, but campsites don’t come much more beautiful and welcome than this.
Sat close to the Arctic Circle in Sweden, not far in fact from the birthplace of our tipi, this early August attempt at night must rank as one of our most memorable, but with the correct kit, and armed with a few useful tricks and strategies, even the wildest or coldest nocturnal offering can be as snug and enjoyable as any spent at home.
So what do you need?
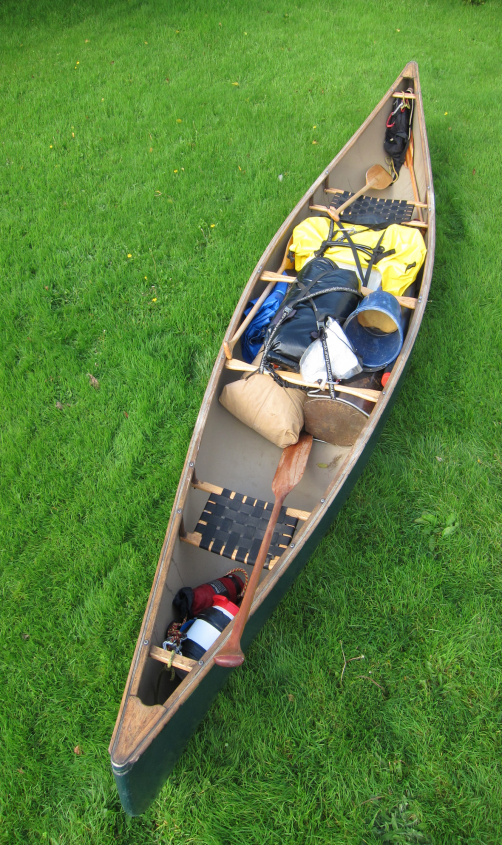
Well at the outset I’d like to stress that there’s no single correct way to set about canoe camping. Whether it’s a question of what to take, how to take it, or where to go with your loaded vessel, choices abound. That’s one of the joys. But based on our exploits I have a few suggestions – and first off, you can’t go wrong with a large pile of assorted dry-bags.
With a slight involuntary shudder I well remember PDB days – Pre Dry-Bag that is. Like the Dark Ages, these were times of hardship and stoicism. The wonders of the modern world may have brought us digital photography and the iPad, but more importantly we can now keep our camping gear free from damp – or worse.
Most dry-bags from the well-known makers will do a decent job, even the lightweight ones. Colour is important though – if only because it makes it so much easier to find things. I know I’ll discover spare torch batteries, camera leads, a fancy solar charger and the like in a small lime green thing for example, while a pale blue Exped bag, amongst other things, usually holds a loo roll (much better when dry). First Aid kit goes in… you’ve guessed it, a red bag. You can have fun developing your own coded system.
Although bulkier than the lightweight bags, we also have a couple of big heavy-duty Ortleib versions. Into one of these we stuff sleeping bags, and even a pillow or two (well, we are looking for comfort after all). As these are down-filled they really benefit from being kept dry, and it’s amazing how tight you can then compress one of these waterproof containers. Just make one fold of the lid, kneel on it all to expel the air, wind in a few more turns, and clip shut.
Mind you, excellent as these modern dry-bags usually are, the material being almost totally trustworthy, the lid closure isn’t quite as reliable. This is another reason to aim for a record-breaking collection, and the simple benefits and security of double bagging really can’t be overstressed. Following a good dunking, water may well be able squeeze its way between the tightly rolled lid of one bag, but is unlikely to make it past the second before being pulled from any unwanted fluid embrace. Ahead of particularly dodgy looking outings I’ve been know to triple-bag some dry-loving items before now.
And if you think I’ve been going on a bit about keeping things damp free, I suspect you’ll change your mind once out there – almost wherever you paddle. Even if things don’t end up in the water, there’s still the weather to contend with. You’ll soon understand my minor obsession. And I haven’t finished yet.
While not particularly keen on the big blue plastic food barrels often used for canoe camping – which I find a little too bulky and unyielding – I do acknowledge that they can’t be bettered for protection, both from moisture and knocks. Camera kit for example is definitely best off in a smaller one of these, or a purpose built dry case (horribly expensive, but so much better than a dripping SLR). But as a compromise, I do love the little white Dutch Curtec pots, beloved of dinghy sailors, and available – as the advertisement might put it – at all reputable chandleries. None of these are very big, but you can still squeeze a fairly large camera setup into one of their bigger tubs.
One pre-paddling ritual is to drop my mobile phone and compact camera into ours, before screwing the cheery red lid down tight and clipping it to the stern thwart. The other important item to go in is the van key. Up-to-the-minute technology may be rather wonderful, but modern wet van keys don’t open modern wet van doors. Not a good thing to discover after two or three days spent out somewhere wild.
But wait I hear you say. Sleeping bags may have received a fleeting comment, and there was even brief mention of pillows, but isn’t this supposed to be a blog about canoe camping. What about camping stuff? What about everything else? Any comments on tents for example?
Well yes, but put simply if you prefer a particular type of tent, then use that. This may sound a touch glib, and I know a lot of very useful and informative stuff has been written about tents and canoe camping before now, but in the end it really is that simple. And the reason for this choice is the carrying capacity of your canoe.
Anyone heading into the hills on foot will know the importance of balancing tent quality and size with how much can actually be carried. Manufacturers have spent vast amounts of time and research expenditure perfecting the backpacking or mountain tent – as big and as strong as possible, but still luggable. Wonderful as some of these shelters are, they inevitably represent a compromise, with pretty cramped accommodation. If you have much more than a few inches around your sleeping-mat at night you’re doing well. Cycle-tourers, able to let their vehicle do the donkeywork, fare better, and those that take to the water in a kayak may manage something a tad larger again. But it is when the canoe is deployed to venture into the wild that camping can be elevated to proper outdoor living. And the reason – carrying space – loads of it.
In addition to Susannah and myself, our 16-foot canoe can transport hundreds of pounds of kit. Suddenly the size and weight of a tent is of no concern whatsoever. Take what you like – even a small marquee if you want.
 |
| Ready to go! Image Copyright Tim Gent. |
For us the criteria for the perfect canoe camping tent includes bomb-proof construction (in a material that could be repaired easily in the field if something really went wrong), excellent foul weather characteristics and plenty of room to stand and move about. Ease and speed of pitching, preferably single-handed, is important, and the ability to place a wood-burning stove inside is also a high priority.
After considerable research and deliberation, one tent stood out, and we’ve been using a Tentipi Safir 7 very happily for a couple of years now. Not small for two it’s true, but no problem for our canoe, and I can put up this well-designed tipi on my own in a matter of minutes. Now Susannah and I enjoy more excellent tent space than we can ever really use.
Along with the Tentipi tent, its groundsheet, and our Ortleib-encased sleeping bags we also carry Thermarest mattresses (true wonders of the modern age). For our wetter or cooler expeditions we ship an Eldfell Pro wood-burning stove.
This good looking stove heats our tipi, and almost as importantly dries all the damp clothing we keep bringing in – a very important consideration in north-west Europe. We cook on it when it’s in action, or alternatively on an open fire outside. To supply these with fuel we carry a bow saw and axe.
Now for me, who has been fiddling with fires since childhood, it’s almost no effort, but if you’re not familiar with selecting, cutting and splitting wood, or tending a fire, just take a gas stove. There is no requirement to fight the elements out there, and certainly no need to feel bad just because you can’t start a blaze with an old Viking fire steel and the nearest pebble. This is supposed to be fun after all. Besides we’ve shipped a double-ring gas burner and large orange bottle ourselves before now when the environment was too sensitive for an open fire.
One important comment here though, and forgive me for seeming to state the obvious – but whether using a wood fire or cooking over gas you will need matches. I really do carry a fire-steel. I even use it sometimes, but I’m much more likely to reach for one of four, five or even six boxes of matches, each tucked into a different dry-bag and secreted at various easy to find (hopefully) points throughout our kit collection. Like dry-bags, you just can’t carry too many.
Cooking and eating kit can be as simple or as complicated as you like – remember you have the space. We tend to carry a standard frying pan and set of nesting MSR stainless steels saucepans. A wooden spatula is useful, and a knife is a must (whether cooking or at any time while out canoe camping). Depending on what you take to eat a can and bottle opener will be invaluable too. We also have a thin plastic cutting board for food preparation. This slots conveniently, and by pure luck, into the recessed lid of our plastic food box/cutting table/eating table. This box isn’t waterproof, but fits the bill in so many other ways that we haven’t felt able to replace it. Made of clear(ish) plastic, we can even see what’s in it.
And while mentioning plastic I will admit that although usually keen on traditional materials, this doesn’t stretch to eating utensils. Light, easy to pack, and difficult to break, plastic makes great gear to eat off and with – we just take a couple of large bowls (less spillage than with a plate) and a few Sporks. When it to comes to mugs, plastic or wood is best. If you like hot tea or coffee, and are partial to retaining the skin on your lips, even your fingertips, steer well clear of metal.
Like the tent, when it comes to what to take to eat, it’s up to you. As I’ve said before, there’s plenty of room. Delicate things can be wrapped in a tea-towel (very useful, along with paper kitchen-roll. Oh yes and tin-foil and a scrubbing brush and/or scourer).
Other campsite favourites include a big black plastic trug – the sort used to feed horses. We fished ours from the water of Loch Sunart on the west coast of Scotland one sunny morning, and have yet to spend a day in the wild without filling it with kindling, mushrooms or spare fishing tackle. We also always carry a large stainless steel Kelly Kettle. A comprehensive repair kit (needle and thread, plastic pull ties, duct-tape, wire, araldite etc.) often comes in handy too.
Next, in what has almost inevitably turned into something of a list, is insect repellent. You will be by water all day and night after all. Whether dealing with Scottish midges or those ravenous northern Swedish mosquitos, you’ll be glad you took something effective.
And last, but not least by a long way, I must mention that other canoe camping star of the modern world – the wondrous headtorch. If my Petzel isn’t strapped in place and in use in the evening, it will be hung ready for action around my neck. I’ve been known to sleep with it there, often forgetting to remove it in the morning. Other members of the family like to guess when I’ll finally notice and remove it.
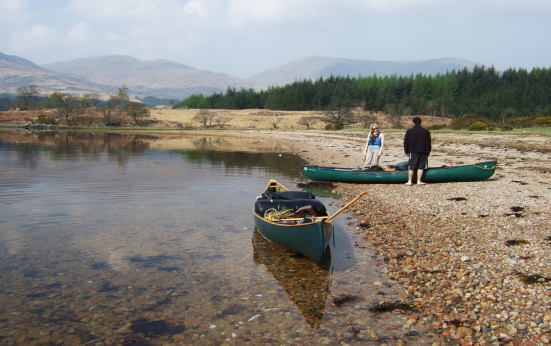
So, finally, imagine yourself by a west coast Scottish sea loch (always a good place to start). A large pile of assorted dry-bags, spare paddles, boxes, and folded canvas sheets lie scattered across the shore by your empty canoe. How do we pack it all in?
Low and snug would be best, and key to all good canoe packing is placing the heavy bits at the bottom. If you have a stove, this certainly goes in first. Big tents are usually best off down here too, as are hard-edged things such as food boxes (by chance ours jams tight amidships beneath the centre thwart). Weight should be distributed evenly, usually with a slight bias towards the stern to help steerage. I admit this can sometimes require minor alteration, such as when working into a stiff breeze, but is fine most of the time. You can usually pull ashore to adjust things easily if needs be. Practice is the best way to achieve this balance, but you’ll soon see if things are wrong when you compare the waterline with the gunwale. Just look to see the bow a little higher in the water than the stern.
Try to keep as much as possible below the thwarts. Long skinny things such as spare paddles, fishing-rod tubes, and camera tripods can be wedged alongside the lower layers. Light bulky stuff – groundsheets, sleeping bag rolls and the like – can be shipped above the thwarts if need be, tied down tight. If it’s likely to rain, the groundsheet can be opened out to offer things below a little extra cover, although as everything should be in dry bags anyway this is more to help keep water out of the canoe.
Apart from the security of knowing everything will stay dry in rain, all this dry-bag use has another very important benefit. If water can’t get in, air has almost as much trouble sneaking out. Even if packed pretty tight, a lot of this lighter than water stuff is trapped amongst clothing, bedding or food. A plastic fishing-rod tube offers perhaps six or seven litres of additional buoyancy for example. All very handy if things do ever go awry. It has been claimed before, and I concur – that a canoe packed for camping, using plenty of waterproof containers, and with everything secure, may turn over, but is very hard to actually sink.
As this makes sense to me – and I’ve tested it – I don’t want things to move. Just to be on the safe side, almost everything I put regularly in a canoe has a climbers quick–draw clipped to it by one of the two karabiners. This may seem a little extravagant, and these lengths of super-strong tape (sling) with a clip at each end aren’t cheap, but half a dozen or more make for individual security systems that are oh so easy to attach and remove. As I pack everything in, I just clip it into the next item, working the sling under or around a thwart to help.
To provide the final security system I’ve found that the 5m Palm straps I use to hold the canoe on the van’s roof rails, make excellent tie downs. You will probably already have these, or something like them, so no need for more expenditure. And unlike ropes, there is no need to master a range of difficult knots (which even if you can tie them are never much fun to produce with cold wet hands). Just thread them through and over everything, loop them under a thwart or around a seat strut, and pull tight, and you’re ready for the off.
So where to go?
 |
| Loch Etive, Scotland. Image copyright, Tim Gent |
The simple answer is wherever a suitable stretch of water takes you to somewhere you’re allowed to put up a tent. For us English, with horribly restrictive access legislation, there’s not a huge amount of choice at home. Unless you have the time and funds to head for Sweden or Norway (a slight pause in typing while I gaze unfocussed towards the northern horizon and sigh) there is really only one place – and thank the stars for Scotland. Mind you, if you have just one country to provide a home for canoe campers, you could do a lot worse than this gem.
So at long last, as the bow slices through the water towards your chosen campsite, and cares slip away in your wake, I hope you find as much enjoyment out there as we do. At the very least it will be interesting. I suspect the experience may well turn out to be something truly memorable.
Oh, and that remote riverside camping spot I mentioned in the introduction.
Waking the next morning to yet another cloudless summer day, I’d nudged the fire back into life and set the kettle to boil for tea while breakfast oats soaked in milk. It was only on striking the tipi that I noticed the stones. These encircled the small flat space where our tent had been, a chance but perfect fit, presumably created by northern Sweden’s first inhabitants.
As I packed away our tent, and the kettle started to steam, I pondered on who might last have used this remote and obviously important place.
— 0 —
Related blog posts

It was the first day of the trip, adventurer Mike Fuchs and his friend Eric Folz had just a couple of hours before been dropped off as far north as they could possibly come in Svalbard when they saw them. Two polar bears, one mother and its cub. A situation that could become deadly if the bears decided to have a closer look on their new visitors.
“I know how protective the mothers can be of their cubs. We had to set up our camp in a place that provided a good overview of the location so we could spend the night bear watching. It was both a scary feeling seeing them so early into our trip, but it was also very fascinating”, says Mike Fuchs.

Wouldn't it be exciting to spend the night right in the middle of a zoo? – That is exactly what you can do at Skånes Djurpark, a wildlife park in southern Sweden. At their campsite, Camp Oak, you stay in the park after it closes and will make yourself at home in a Nordic tipi from Tentipi. When the night comes you might just fall asleep to the wolves’ howls.
Skånes Djurpark is a Wildlife Park with a long history, it dates back to 1952. It focuses on animals from the Nordic area and has always lived by the ruling with “no animals in cages”. The animals live in large paddocks that recreates the animals’ natural environments.

Lennart Pittja is a Sámi entrepreneur with a mission: with his world-renowned eco-tourism company he wants to spread the knowledge about his people – the Sami, indigenous of northern Scandinavia and Russia. With over 20 years of experience as a wildlife guide and nature photographer in the arctic region he started Sápmi Nature Camp. Where his guests stay in Nordic tipis from Tentipi on his reindeer herding land outside of Gällivare, in northern Sweden.
At Sapmi Nature camp you can experience real winter, see the northern lights, eat traditional Sami food, and have a cultural exchange in a genuine atmosphere. The scenic location has gained attraction from around the world. In 2017 it was listed by National Geographic as one of the top 21 places in the world to visit if you care about the planet.

Prepare before setting out for winter camping. Here are nine tips and tricks from Tentipi about what you need to think of before you go: the right tent for winter camping, how to pack the snow, comfort in snow, which tent pegs to use, where to pitch the tent, about snow weight, what heat sources can be combined with the tent, how to make a fire safely and other equipment.
Choose tents according to occasion, different tent types work differently at winter camping. When it’s icy, the tent needs to be more robust than a tent which is exclusively used in summer. The tent frame needs to withstand a certain amount of snow and functional ventilation is important. If you want to use a heat source, for example a fireplace or a stove, the tent needs to have ventilation openings both at ground level and at the top. Without a heat source, a smaller tent is preferable, as it heats up faster when the air volume is smaller.

A tent from Tentipi is a Nordic tipi and the tent has eight or nine sides, if it is not the smallest that has six sides. In the smallest tent you can stand straight if you are less than 160 centimetres long and in the largest you can get together several thousand people. The tent is versatile in more ways. Continue to read to see why these tents are so flexible and adaptable. This blog post is about the smaller tents in Tentipi's range, tents used by adventurers, families, hikers and others who want to live close to nature for a shorter or longer period of time.